

Help


Mapping - Part I: The Map Editor
Welcome to the CS2D Mapping Tutorial! This tutorial will show you how to create your own CS2D Maps!First we have to start the map editor:
- Start CS2D
- Click the 'Editor'-button in the main menu
This seems to be very complex at the first glance but you will learn to use it very fast!
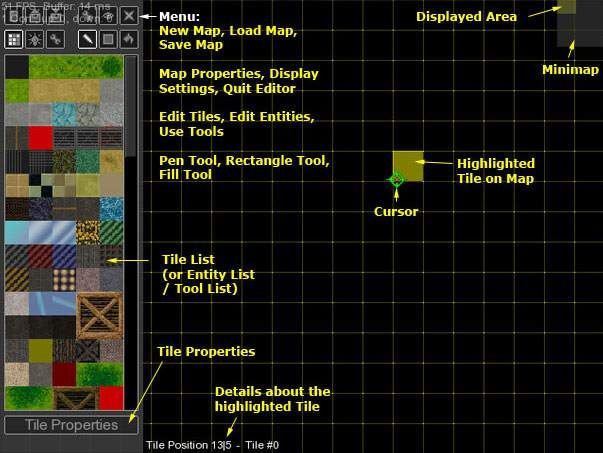
Here's a short info about all parts of the map editor:
Cursor / Highlighted Tile
 The green crosshair is your mouse cursor. You can use it to click buttons or to select/set/edit tiles and entities.
It will always highlight a tile when you move it over the map area with the grid. A tile is a square with a size of 32x32 pixels. Each map consists of a lot of tiles (and some 'entities' which control the behavior etc.).
You can also see the coordinates and the frame of the highlighted tile at the bottom of the screen. They start with 0|0 at the left top corner of the map.
Menu
The menu contains many buttons which are seperated in four groups. Each group has three buttons.
 The first group (top left) contains buttons to create a new blank map, to load a map and to save it. I think it's obvious what you do with these.
 The second group (top right) contains map properties, display settings and quit. Quit can be used to close the editor of course. Map properties lets you change the size, the tileset and the background for your map. Display settings can be used to control what the editor displays. You can disable the shadows, the yellow grid or the minimap for example.
 The third group (bottom left) is used to switch between tile editing, entity editing and tools. The list below changes when you click one of these buttons.
 The last group (bottom right) contains the tile editing tools. You can either set tile by tile with the pen tool, set a rectangle of tiles with the rectangle tool or fill a complete area with the fill tool.
Tile List + Tile Properties (or Entity List or Tools List)
 This list can be used to select a tile.
Hint: An alternative way to select a tile is to rightclick a tile on the map!
You can also change the properties of a tile with the 'Tile Properties'-button.
The tiles which are displayed here are part of the map's tileset. A tileset is a simple image file which contains up to 256 squares. Each square has a size of 32x32 pixels and forms a tile. You can use every program which can save images (bmp,png or jpg) to create your own tileset! The tilesets are saved in 'gfx/tiles' in your CS2D directory and you can select one in 'Map Properties' or 'New Map'!
At this place you can also see a list of entities or a list of tools - depending on your current editing mode.
Minimap
 The minimap shows your map and allows you to jump to each position by left clicking it.
The yellow area marks the part of the map you see on the screen.
You can close it with a checkbox in 'Display Settings'.
Please also note that the minimap will not display the actual tile colors. It just displays walls (white), obstacles (grey), deadly tiles (red) and water (blue). This helps you to keep an overview over the structur of your map.
That's it! These are the basic parts of the editor!
Continue!